Reference image editing is not the same job as blank-canvas AI image generation. In a normal generation workflow, the model can invent the scene. In a reference-image workflow, it has to respect what the user uploaded: the face, product, room layout, lens angle, lighting, brand details, and composition. The goal is not simply to make a beautiful image. The goal is to change the right part of the image while keeping the important parts intact.
That is why GPT Image 2 AI is useful for creators, designers, marketers, ecommerce operators, and content teams. A creator may want several platform-ready versions of one profile photo. A marketer may need a product placed into a seasonal scene without redesigning the product. A designer may want to test backgrounds and props before finishing in a design tool. A blog or social team may need consistent visuals without rebuilding every asset from scratch.
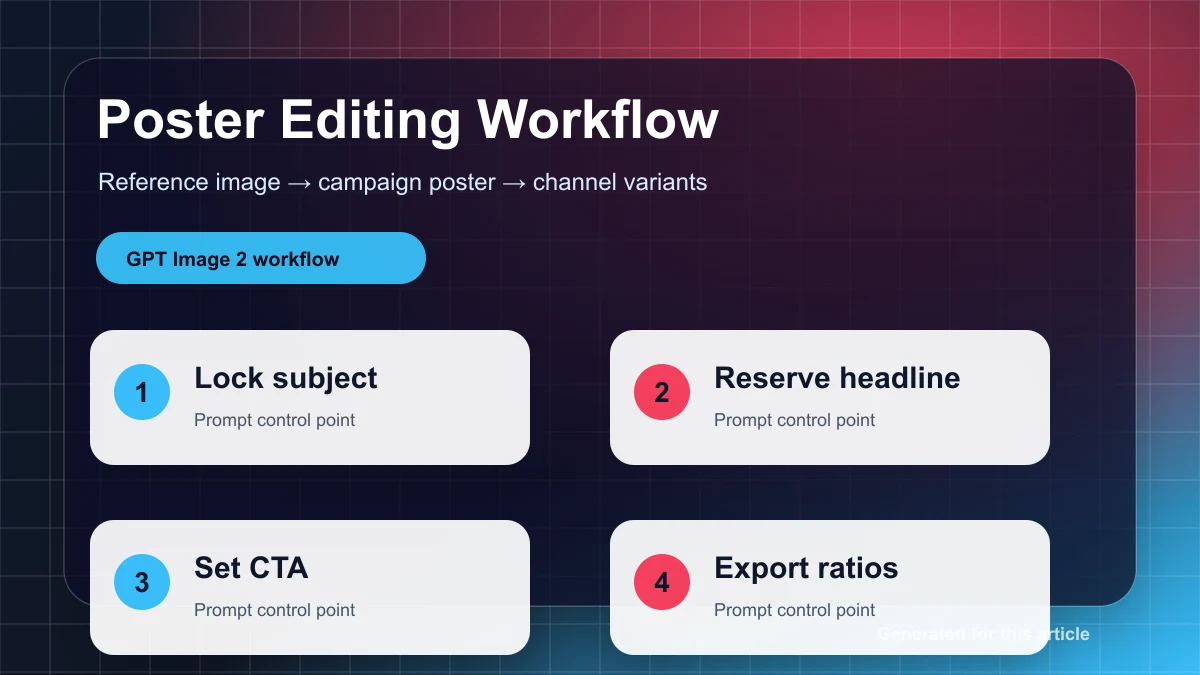
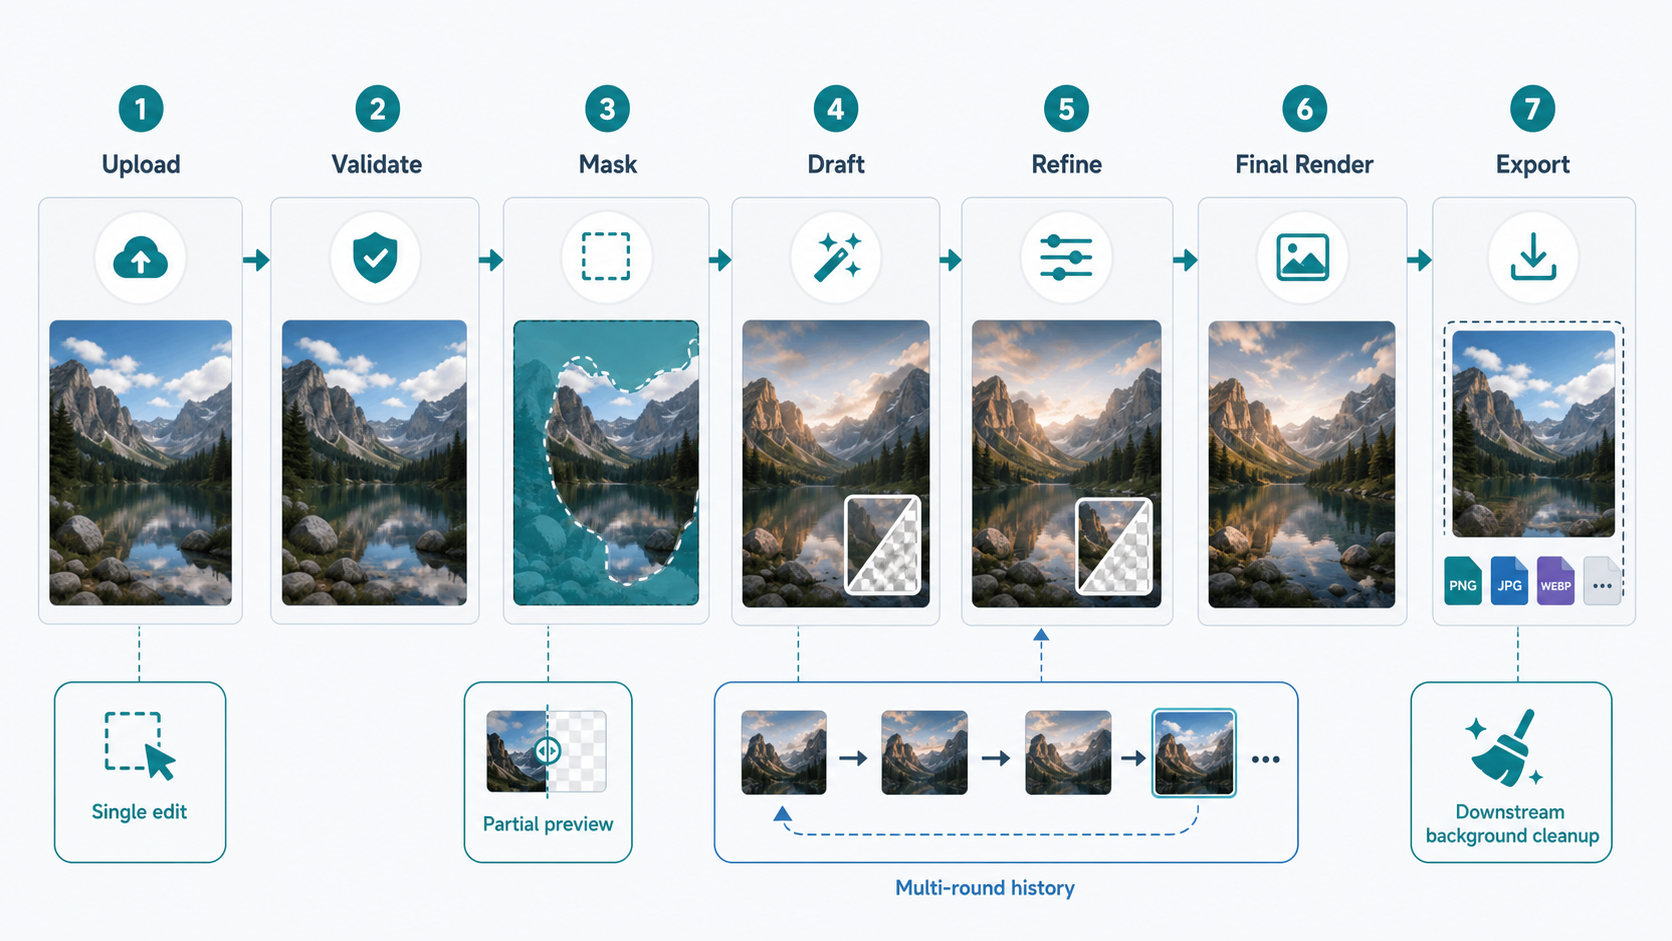
The practical workflow is not “write one perfect prompt.” It is a controlled editing loop: upload the source photo, define what can change, generate a draft, review it, refine one issue at a time, and export for the channel. According to official OpenAI documentation summarized in the source report, GPT Image 2 supports reference images and image editing, while the API surface separates single-shot edits from multi-round refinement. That distinction matters because serious reference editing is rarely finished in one pass.
What Reference Image Editing Is Best For
Reference editing works best when the uploaded image already contains something worth preserving: a person’s identity, a product shape, a package label, a room layout, a camera angle, or a carefully chosen composition. Instead of asking the model to invent everything, you ask it to edit around existing visual evidence.
Common use cases include product cleanup, background replacement, outfit or prop changes, creator portraits, ecommerce images, ad mockups, blog hero images, presentation graphics, and social variations. The shared requirement is control: the output should still feel connected to the original image.
For GPT Image 2 AI as a clean online image generator and editor, the product experience should feel like a lightweight production workspace: upload, preview, protect, edit, compare, refine, and export. Users should not have to rewrite long preservation prompts every time. The interface should help them choose constraints such as keep face, keep background, keep camera angle, preserve product label, or only edit the masked area.
The caveat is simple: AI editing is not a pixel-perfect design application. It can produce strong results, but strict typography, exact layout measurement, sensitive brand work, and long-term character consistency still need review and sometimes downstream design tools.
The Core Workflow
A reliable reference-image edit starts before the prompt. File quality, crop, mask, target size, and export format all affect the result.
Start by uploading a supported image format such as PNG, JPEG, or WebP. The product should validate file type, file size, dimensions, orientation, and output size before sending the request. Source-report notes from official documentation also point to image-size constraints, including dimensions that should align to valid multiples, maximum edge limits, aspect-ratio limits, and total-pixel boundaries. In production, staying conservative is usually better than pushing the largest possible canvas.
Next, crop for the intended use. If the final asset is a blog hero, ad creative, ecommerce image, or social post, choose the target framing early. Do not ask the model to solve composition and editing in the same step unless the task is intentionally exploratory.
Use a mask when the edit is local. Mask the coffee cup if only the cup should change. Mask the wall if only the background texture should change. Mask the floor area if a rug needs to be added. Do not include a face, hand, product logo, or package label in the mask unless that area is meant to change. The source report notes that masks should be treated as guidance, not absolute pixel-level locks, so the safest workflow is to narrow the editable area and restate what must stay fixed.
Generate a draft before the final pass. Low or medium quality is useful for checking direction: did the model understand the edit, keep the person or product stable, respect the camera angle, and avoid changing protected details? Once the direction is right, use a higher-quality pass for the finished visual.
Refine in small steps. Do not change the background, lighting, object, color grade, and text all at once. If the object is correct but the shadow is wrong, ask only for shadow correction. If the composition is good but the color temperature is too cool, ask only for a warmer match. Every round should repeat the invariants: face unchanged, product shape unchanged, label unchanged, camera angle unchanged, background layout unchanged.
Export based on use case. PNG is useful for archival and design handoff. JPEG and WebP are usually better for web delivery. If a transparent asset is required, do not assume GPT Image 2 can directly produce it. The source report notes that official documentation says transparent backgrounds are not currently supported for GPT Image 2. A practical path is to generate a clean opaque white or solid-color background first, then use downstream background removal if transparency is needed.
API Boundaries That Matter
The source report separates three implementation paths.
The image generation path is for text-to-image work without a user reference. It is useful for concept visuals and article illustrations, but it is not the main path for editing an uploaded photo.
The image edits path is for single-shot editing. It accepts an uploaded image and, when needed, a mask. This is the clean choice for stateless jobs such as replacing one object, changing a local background, removing a distraction, or producing one finished variation.
The Responses API with an image-generation tool is better for multi-round editing. It can preserve a history chain, refer to previous responses, use file IDs, and support iterative workflows. For a web editor, this matches the way users work: upload once, generate a draft, ask for a smaller change, compare versions, and continue. The source report also notes partial-image preview support in relevant image-generation flows, with the caveat that partial previews can add token cost.
For GPT Image 2 AI, the product rule is straightforward: use direct image editing for quick one-off jobs, and use a multi-turn response chain for an editor experience with history and refinement.
Handle documentation edge cases defensively. The report notes that older examples may mention input_fidelity, while newer guidance says GPT Image 2 already handles input with high fidelity and this parameter should be omitted. File-upload purpose values and streaming terminology may also vary across pages. The right response is a backend whitelist of tested parameter combinations, not a UI that exposes every possible option.
Prompting: Tell the Model What Must Not Change
Good reference-edit prompts are constraint lists. They should say what to change, what to preserve, and how realism should be judged.
A weak prompt says: “Make this product photo better.”
A stronger prompt says: “Replace only the masked background area with a clean light-gray studio backdrop. Keep the product shape, label text, logo placement, camera angle, scale, reflections, and front-facing composition unchanged. Match the original lighting direction and add only a subtle natural contact shadow. Do not add text, watermark, extra props, or new branding.”
That structure works because it limits freedom. For portraits, protect identity explicitly: face, facial features, skin tone, expression, hairstyle, head shape, body proportions, and camera angle should remain unchanged. Better still, keep the mask away from the face unless the face is the intended edit target.
For products, protect geometry and labels: product silhouette, proportions, material identity, label placement, readable text, logo, packaging structure, and camera perspective. For ecommerce work, ask for a clean opaque white background instead of a transparent background.
For interiors and composites, protect perspective. Say where the new object should go, how large it should be, what it aligns with, and how its shadow behaves. “Place the floor lamp to the right of the sofa and match the room’s warm side lighting” is better than “add a realistic lamp.”
For style transfer, separate content and style references. If image 1 is the person and image 2 is the mood, say that image 2 should guide color temperature, contrast, and lighting atmosphere while image 1 keeps identity, pose, clothing structure, and layout.
The product can make this easier with protection chips: keep face, keep hair, keep skin tone, keep product label, keep background, keep camera angle, only edit mask, match lighting, add contact shadow. Behind the scenes, those chips become invariant statements appended to the prompt.
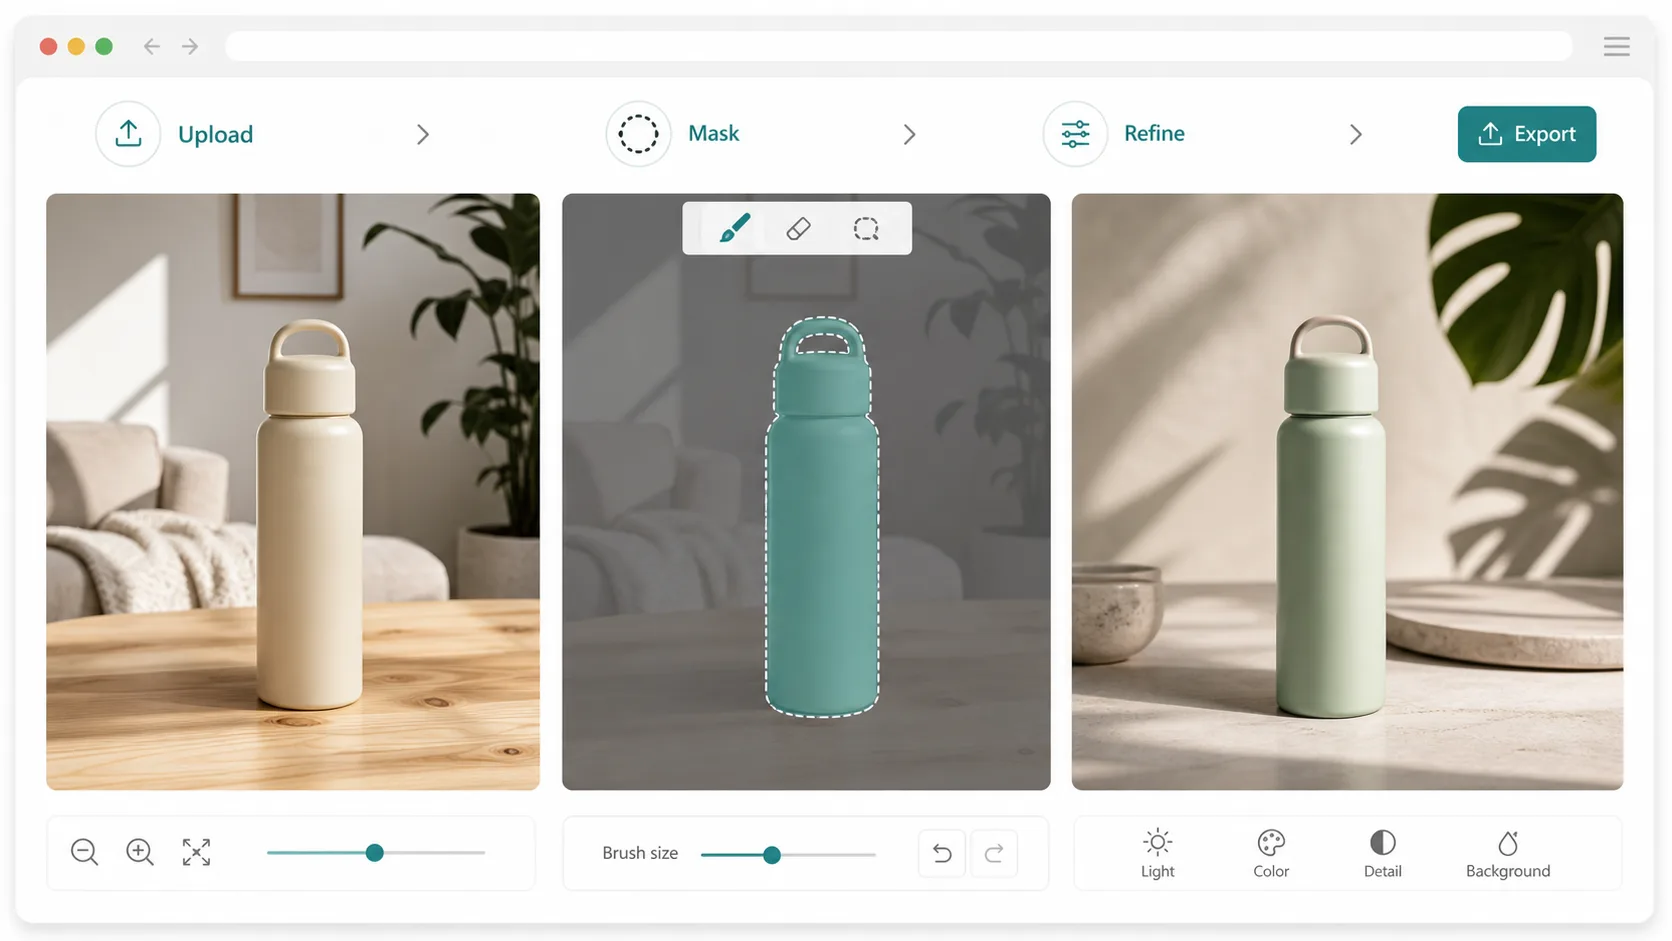
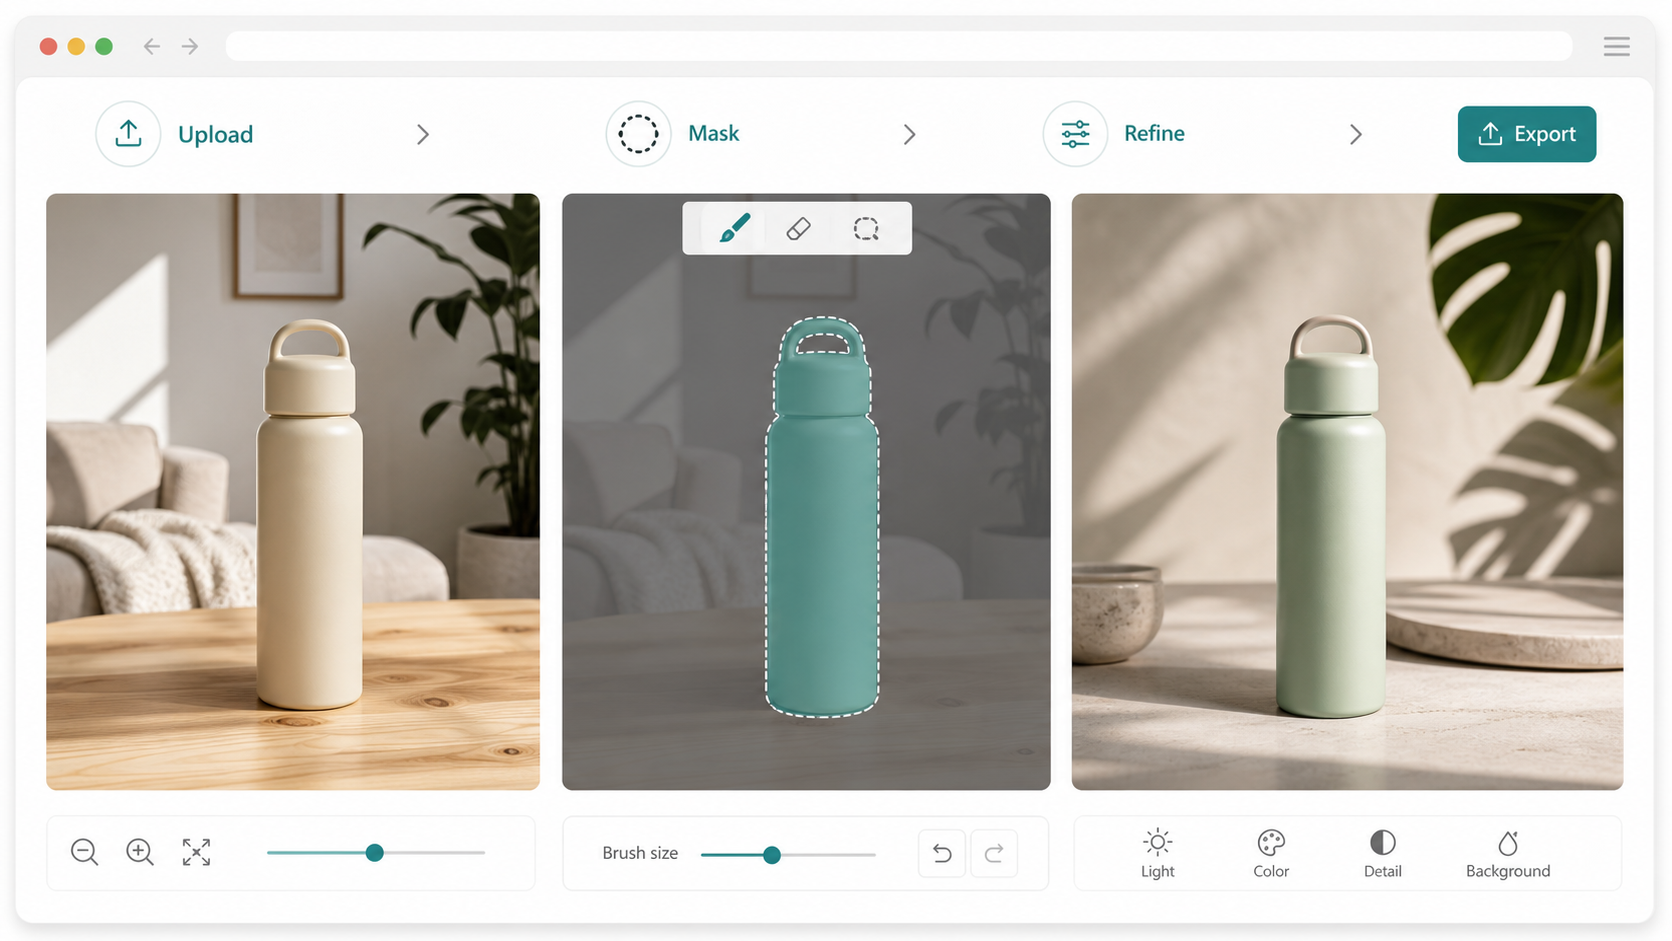
Masking Best Practices
Masking is one of the strongest controls, but it is not magic. Treat the mask as guidance. If the mask is too tiny, the new object can look pasted on. If it is too broad, the model may change details that should have stayed fixed. For object replacement, include the object plus a little surrounding edge area. For shadow correction, include the contact area. For background replacement, avoid foreground hair, hands, faces, labels, and product edges unless those details truly need reconstruction.
A useful editor should show the mask overlay, support brush size changes, allow undo, and provide zoom. Helpers such as protect subject or protect face can reduce accidental edits better than longer prompts.
When the model changes too much, do not automatically add more words. First check the mask, then simplify the request, then split the job into stages. If changing a jacket changes the face, mask only the jacket and repeat the identity constraints. If replacing a wall changes the furniture, edit the wall separately from the furniture.
Quality, Size, Cost, and Speed
Cost and latency are workflow design issues. If every draft uses high quality, large dimensions, many reference images, and partial previews, the experience will feel slow and expensive. If exploration uses draft settings and final quality is reserved for approved directions, the workflow becomes predictable.
The source report summarizes official pricing examples and rate-limit tiers, but those numbers should not be treated as permanent promises. Pricing and limits can change, and account-specific limits should be checked in the provider dashboard. A user-facing editor only needs to communicate the practical version: draft mode is faster and cheaper, final mode is slower and more expensive, very large images may be less stable, and partial previews can improve perceived progress while adding cost.
The report also notes that complex prompts may take up to around two minutes in some official descriptions. That makes progress states and recoverable history important. If a request fails, the product should preserve the uploaded image, mask, prompt, and previous versions.
Troubleshooting Common Problems
Identity drift usually means the editable area was too broad, the prompt did not protect key details, or the request changed too many things in one step. Fix it with a smaller mask, stronger invariants, and smaller refinement rounds.
Pasted-looking composites usually need better light and shadow instructions. Mention contact shadows, light direction, perspective, occlusion, material fit, and color temperature. Often the best second pass is only “fix the shadow and lighting,” not “regenerate everything.”
Rough edges and halos often come from expecting one step to create a perfect cutout. For ecommerce assets, first ask for a clean opaque white or solid background, centered composition, crisp edges, and natural shadow. Handle transparent PNG output downstream.
Wrong layout is a predictable limitation. Models can struggle with exact spacing, strict grids, and important readable text. Generate the visual element first, then finish precise layout and typography in a design tool.
Parameter errors are preventable. Validate file type, file size, dimensions, mask format, output size, output format, and allowed parameter combinations on the server. Do not rely only on client-side checks for anything tied to cost, storage, or external API calls.
UI and UX Pattern for GPT Image 2 AI
The best reference editor is not one giant prompt box. A strong layout has a left asset rail for originals, references, masks, and history; a center canvas with comparison, zoom, pan, and mask overlay; a right panel for instructions, protection chips, quality, size, format, and cost; and a bottom timeline for drafts, refinements, previews, and export.
The UI should make constraints visible. If transparent background is unsupported, say so where the user chooses background output. If a size is invalid, block it before submission. If the render is draft quality, label it as draft. If the user is editing a face, show identity-protection options. If a local edit has no mask, recommend creating one.
Version history is essential. Users need to compare, return to a previous draft, and refine the best version. Multi-round editing becomes much more useful when each generation has visible settings, prompt context, and output.
Safety, Privacy, and Rights
Reference editing often involves personal photos, brand assets, product shots, and client material. According to official OpenAI documentation summarized in the source report, API inputs and outputs are not used for model training by default, with monitoring and retention depending on account configuration and eligibility. That does not remove the product owner’s responsibilities.
A web editor still needs secure uploads, access control, storage lifecycle rules, deletion behavior, log minimization, and clear privacy language. Original photos should not be stored longer than necessary unless the user expects saved project history. Share links and public galleries should not expose private images accidentally.
Rights are separate from storage. Owning or receiving an output does not automatically grant permission to use a third-party trademark, copyrighted artwork, a person’s likeness, or a protected design. Users should make sure they have the rights needed for the uploaded material and intended use. Content moderation is also a boundary; moderation settings are not a way to bypass safety rules.
Provenance metadata such as C2PA can be affected by compression, export, or CDN handling. If provenance matters, test the final delivered file, not only the initial generated result.
When GPT Image 2 AI Is the Right Tool
GPT Image 2 AI is a strong fit for a clean online workflow: upload a real image, make controlled edits, refine the result, and export usable visuals. It is especially suitable for creators, marketers, ecommerce operators, blog editors, and small teams that need speed and consistency without opening a full design suite for every variation.
It should not be positioned as the only tool. Photoshop-style tools remain better for expert manual control, exact selections, layered design, and final retouching. Stable Diffusion-style pipelines can be better for private deployment, custom models, and deep structural control if the team has the engineering capacity. Midjourney-style tools can be excellent for mood exploration, but they are less natural as deterministic web-app backends for strict reference-photo editing.
The practical answer is to use GPT Image 2 AI where it is strongest: structured online editing, reference preservation, mask-guided changes, multi-round refinement, and creator-friendly exports. Be honest about the edges: no transparent-background guarantee, no perfect text-layout guarantee, no absolute mask obedience, no automatic rights clearance, and no promise that one prompt will solve every visual problem.
Final Takeaway
The best reference-image editing workflow is small, explicit, and reversible. Upload the image. Validate it. Mask only what should change. Generate a draft. Preserve important details in every prompt. Refine one issue at a time. Export for the channel. Use downstream tools when transparency, exact layout, legal review, or pixel-level finishing is required.
That is how GPT Image 2 AI can turn an uploaded photo into a finished visual without pretending the process is magic. The value is not only the model; it is the workflow around it: constraints, history, comparison, cost awareness, privacy, and a user interface that helps people make better edits with fewer failed attempts.